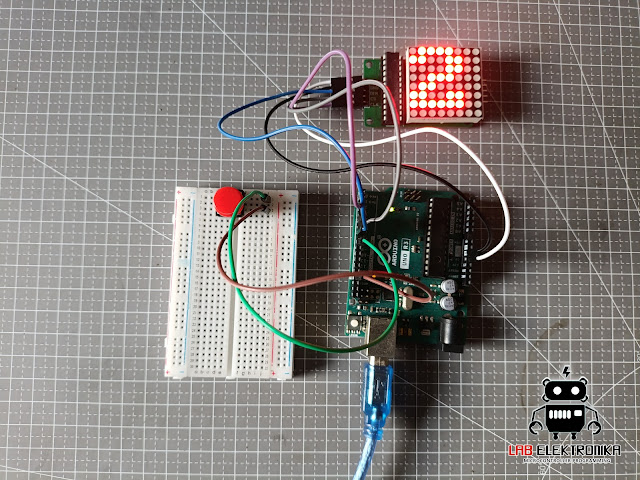
Praktikum Arduino 4 : Tutorial Program Membuat Counter Led Display Dot Matrix 8x8 Dengan Arduino
Untuk Tutorial Membuat Counter Led Display Dot Matrix 8x8 Dengan Arduino , cara kerjanya counter up, jadi ketika tombol di tekan nomor bertambah dan di tampilkan di led Display Dot Matrix 8x8
Module/Part yang di butuhkan :
- Arduino Uno
- Kabel USB Type A to Type B
- Breadboard
- Push Button
- Module Led Dot Matrix 8x8
- Kabel Jumper Male-Male dan Male-Female
WIRING DIAGRAM
ALOKASI PIN ARDUINO
- Led Dot Matrix 8x8
| Led Matrix 8x8 | Arduino |
| Pin 1 (Vcc) | +5V |
| Pin 2 (Gnd) | Gnd |
| Pin 3 (Din) | pin 7 |
| Pin 4 (Cs) | pin 6 |
| Pin 5 (Clk ) | pin5 |
| ||||||
DEMO VIDEO | ||||||
CONTOH PROGRAM |
#include <LedControl.h>
#include <Pushbutton.h>

const int pinDIn = 7;
const int pinCs  =  6;
const int pinClk = 5;
const int pinButton = 8;
LedControl lc = LedControl(pinDIn,pinClk,pinCs,0);
Pushbutton button(pinButton);
int counter=0;
byte disp1[8]=
{
0b00110000,
0b01110000,
0b00110000,
0b00110000,
0b00110000,
0b00110000,
0b11111100,
0b00000000
};
byte disp2[8]=
{
0b01111000,
0b11001100,
0b00001100,
0b00111000,
0b01100000,
0b11001100,
0b11111100,
0b00000000
};
byte disp3[8]=
{
0b01111000,
0b11001100,
0b00001100,
0b00111000,
0b00001100,
0b11001100,
0b01111000,
0b00000000
};
byte disp4[8]=
{
0b00011100,
0b00111100,
0b01101100,
0b11001100,
0b11111110,
0b00001100,
0b00011110,
0b00000000
};
byte disp5[8]=
{
0b11111100,
0b11000000,
0b11111000,
0b00001100,
0b00001100,
0b11001100,
0b01111000,
0b00000000
};
byte disp6[8]=
{
0b00111000,
0b01100000,
0b11000000,
0b11111000,
0b11001100,
0b11001100,
0b01111000,
0b00000000
};
byte disp7[8]=
{
0b11111100,
0b11001100,
0b00001100,
0b00011000,
0b00110000,
0b00110000,
0b00110000,
0b00000000
};
byte disp8[8]=
{
0b01111000,
0b11001100,
0b11001100,
0b01111000,
0b11001100,
0b11001100,
0b01111000,
0b00000000
};
byte disp9[8]=
{
0b01111000,
0b11001100,
0b11001100,
0b01111100,
0b00001100,
0b00011000,
0b01110000,
0b0000000
};
byte disp0[8]=
{
0b01111100,
0b11000110,
0b11001110,
0b11011110,
0b11110110,
0b11100110,
0b01111100,
0b00000000
};
void setup() {
lc.shutdown(0,false);
lc.setIntensity(0,15);
lc.clearDisplay(0);
Display(counter);
}
void loop() {
if (button.getSingleDebouncedPress()){
counter++;
if(counter>9) counter=0;
Display(counter);
}
}
void Display(int number){
switch (number) {
case 0:
printByte(disp0);
break;
case 1:
printByte(disp1);
break;
case 2:
printByte(disp2);
break;
case 3:
printByte(disp3);
break;
case 4:
printByte(disp4);
break;
case 5:
printByte(disp5);
break;
case 6:
printByte(disp6);
break;
case 7:
printByte(disp7);
break;
case 8:
printByte(disp8);
break;
case 9:
printByte(disp9);
break;
}
}
void printByte(byte character []) {
int i = 0;
for(i=0;i<8;i++)
{
lc.setRow(0,i,character[i]);
}
}


0 Response to "Praktikum Arduino 4 : Tutorial Program Membuat Counter Led Display Dot Matrix 8x8 Dengan Arduino"
Posting Komentar